
Introduction
Für die Messung der Kraft, die beim Pedalieren auf die Kette/den Riemen wirkt, verwendet Stromer einen Torque Measurement Method-Sensor im rechten Ausfallende. Der TMM-Sensor setzt die Kraft in einen Spannungswert um, welchen das Omni auswertet. Die Kalibrierung setzt einen Referenzpunkt in der Unterstützungskurve bei dem keine Unterstützung erfolgt.
„voltage and offset“
Bei der Kalibrierung spielen die beiden Spannungswerte „voltage“ und „offset“ eine zentrale Rolle. Sie werden im Service menu unter Sensors angezeigt:
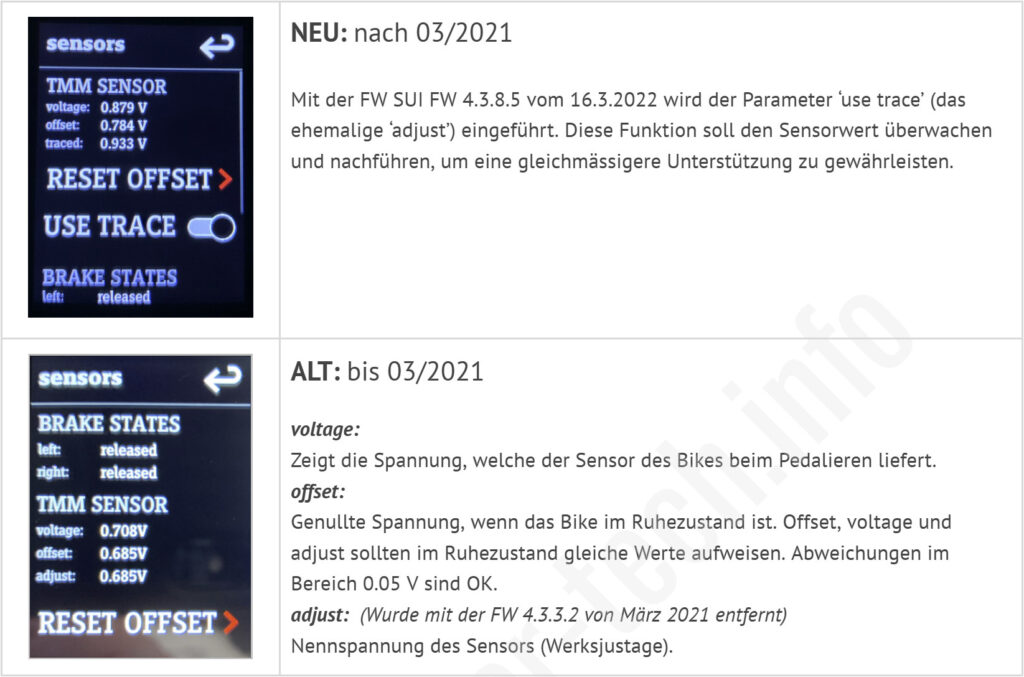
Offset ist dabei die Ruhespannung des Sensors. Sie ist vom Sensor model dependent and must be in one defined voltage range lie.

Voltage ist die Ausgangsspannung des Sensors. Sie steigt proportional zur Kraft an, die beim Pedalieren auf die Kette oder den Riemen ausgeübt wird. Im Ruhezustand ist sie vom Anzugsmoment der Hinterrad-Steckachse, den Befestigungsschrauben der Sensorplatte, sowie der Justierung des eigentlichen Sensors auf der Sensorplatte abhängig.
Purpose of calibration
Bei der Kalibrierung wird die Spannung [V] des „offset“ auf die von „voltage“ gesetzt. Die Differenzspannung beträgt somit 0 V — das ist der Referenzpunkt, bei dem das Omni keine Motorunterstützung generiert. Motto: Wo kein Input, da kein Output.
When pedaling, the TMM sensor immediately generates an increased voltage, proportional to the force exerted on the chain or belt. A differential voltage is created between „offset“ and „voltage.“ This is evaluated by the Omni, and via the controller, the motor is instructed to provide more or less support.
Stabilität und Drehmomente
Die TMM-Sensoren von I|D Bike wurden immer wieder verbessert und neue Modelle brachten eine wesentlichen Fortschritt bei der Stabilität und Ausfallsicherheit. Die neusten Modelle P211 und P218 sind vergossen, haben keine mechanischen Einstellschrauben und sind wesentlich resilienter gegen Schmutz und Fehler.
Kalibrieren / Pozedur
The calibration procedure is not the same for all electric scooters.
ST1 V1 / V1.0 (Display on the handlebars)
On older ST1 models with the LCD display on the handlebars, calibration is triggered by a key combination directly upon startup.
- Turn off the bike Preparation
Der Stromer muss ausgeschaltet sein und die Pedale dürfen nicht belastet sein (nicht die Füsse darauf abstellen). - Press shortcut Power on
Hold the Minus key (–) pressed on the control unit and simultaneously press the Power button, um das Display einzuschalten. Halte die Minus-Taste weiter gedrückt. - Waiting for the code: Calibration mode
Keep the minus button pressed until the display flashes or a specific code (often the display briefly changes) signals that the sensor has learned the current state as its zero point. - Testing: Conclusion
Release the key. The system will now start with the newly calibrated sensor values.
Diagnosis code 1007: Über diesen Code im LCD-Display lässt sich die rohe Signalspannung auslesen. Liegt diese im Ruhezustand (ohne Druck auf die Pedale) ausserhalb des Toleranzbereichs, scheitert auch die eingangs erwähnte Tastenkombination zur Kalibrierung.
See also here and here.
ST1 mit SW Omni (schwarz/weiss)
According to the Omni instruction, you should sit on the old ST1x while on the bike, but do not touch the pedals or engage the brake levers.
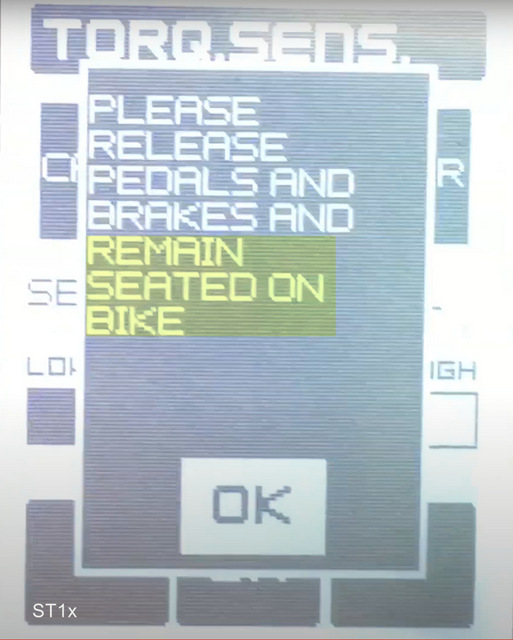
Mounting causes a difference of approx. 20-30 mV for the „voltage“ value („TMM,“ on the old ST1x) and can slightly shift the assistance control towards self-propulsion.
ST2 belt
See CIRCUIT - STORMEY ARCHER - ,Calibration‘
Models with Omni C
When starting the Omni, do not move the wheel. Calibration is performed while standing next to the Stromer, with no load on the pedals. There are two ways:
- Omni → Sensor – Calibration
- Omni Service menu – Sensors – „Reset Offset“
Here a „How to“ Kurzvideo.
The following also applies:
- Calibrate and „Reset Offset“ in the service menu (under Sensors) have the same effect.
- Die Temperaturdrift des Sensors, sowie die Temperatur bei der kalibriert wird, haben Einfluss auf die Unterstützung.
See Chapter ,Details and technical data‘ - Bei Unterstützungsproblemen wird oft voreilig der TMM-Sensor ausgetauscht. Aufgrund der robusten Bauweise, speziell bei den neuen Modellen P211und P218, ist der Sensor nicht immer das Problem.
See Chapter 'Problems with support and possible solutions' - Mehr Anzugs-Drehmoment der Hinterachse verringert die Ruhespannung des Sensors (im Service menu = „voltage“) und umgekehrt.
Update
With the firmware SUI 4.5.0.3 dated March 5, 2025 A bug was fixed that repeatedly required calibration in practice. Stromer writes in the release notes:
A bug that caused the vehicle to no longer provide support due to a slightly too low TMM sensor value has been fixed.
Moped trick...
Mit dem in den Foren umhergeisternden „Töffli-Trick“ soll die Unterstützungskurve mittels einem negativen Offset (Spannung des „offset“ kleiner als „voltage“) in Richtung „Eigenvortrieb“ verschoben und damit die Agilität des Bikes verbessert werden.
Slide/pull the rear wheel slightly to the right at the top. Stand on the left side of the wheel. Place the thumb of your right hand on the right side against the fender, pull lightly on the wheel with your other fingers, and press „Reset Offset“ in the service menu with your left hand, or calibrate in the user menu. However, with the latter, you cannot see how the tension value changes.
V2: Sit on the top tube, pull the right brake, and push the Stromer back slightly with your feet, then calibrate or press Reset Offset. It's best to go into the service menu beforehand to observe the „voltage“ value. It should be about 0.03 to a maximum of 0.05 V above the „offset.“.
V3: Sit on the Stromer, feet NOT on the pedals, calibrate.
How do I reset the TMM sensor on an older ST1 that does not have the touchscreen Omni interface? I have replaced the sensor, but I am not getting any assistance at all.
Try this:
On older ST1 models with the handlebar-mounted LCD display, calibration is initiated via a key combination immediately upon power-up.
Turn off the bicycle
Preparation
Ensure the system is completely switched off and the pedals are hanging freely (do not place your foot on them).
2. Press the key combination
Turn on
Press and hold the minus button (-) on the control unit, and briefly press the power button simultaneously to turn on the display.
3. Wait for the code
Calibration mode
Keep the minus button pressed until the display flashes or a specific code (often the display briefly changes) indicates that the sensor has learned the current state as its zero point.
4. Test
Completion
Release the button. The system will now start with the newly calibrated sensor values.
See also: https://manuals.plus/stromer/stromer-st1-manual#tmm-analysis And https://manuals.plus/stromer/stromer-st1-manual#readout-tmm-values-and-other-information